ATOOD - Project
Eiffel Pattern Wizard
User-Guide
v0.3
Content
1 Introduction
Welcome to the Eiffel Design Pattern Wizard. The Design Pattern Wizard is a tool that helps you boost up the development of software by generating code for defined design patterns or do a refactoring of existing software. This user guide assumes that you have a fair amount of knowledge about the general design pattern. For the reference book for design pattern, have a look at ‘Design Patterns’ by Erich Gamma et. a.
This application provides you with implementation for the following five design patterns: Singleton, Prototype, Builder, Abstract Factory and Factory Method. To add the implementation for another design pattern refer to the developer guide that comes with this package.
The pattern wizard starts up with a graphical user interface (GUI), described in chapter 2. In the following the issues that apply to all design patterns are described.
All created files will be stored in the cluster you specify. The cluster name is therefore identical to a directory name. If you choose to use a class that already exists in this cluster, then this class file will be changed. A backup copy of the original file will be stored for future reference. The backup files can be found in the same cluster, having an additional file extension .bak.
While using the application, you are asked to enter class or cluster names. The following restrictions apply to these names:
Rules for valid class names are:
- No two class names may be equal
- A class name may not be empty
- A class name may not be an Eiffel keyword (e.g. feature, inherit etc)
- Every character of a class name may satisfy ‘is_alpha’ or ‘is_digit’ from class CHARACTER_REF or is a ‘_’ (underscore)
- A class name may not start with a digit or an underscore
Rules for valid cluster names are:
- Cluster name may not be empty
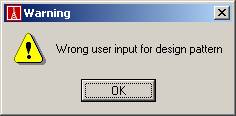
If you input information that does not obey to these rules, the following warning is presented on pressing Create:
2 Graphical User Interface
After starting the application as described in the introduction, the patternwizard presents itself with the following screen.

In the ‘Design pattern type’ dropdown-menu you can choose the design pattern for which you would like to use the pattern wizard. On change of the selected pattern the GUI presents you new options. These are described in the following five chapters.
The cluster where the generated code will be saved is given in the field ‘Cluster name’. You can either chose a new or empty directory, if you want the code to be generated from scratch, or an existing cluster, if you want to apply the pattern wizard on existing code. You can use the button Open existing to browse your local filesystem.
If you wish to close the application you need to press the button Quit.
2.1 Singleton
To create code for the Singleton Design Pattern or to apply this design pattern to an existing class you choose Singleton in the Design pattern type dropdown menu. The available parameters for this pattern are Singleton class and Shared singleton as seen in the following screenshot:
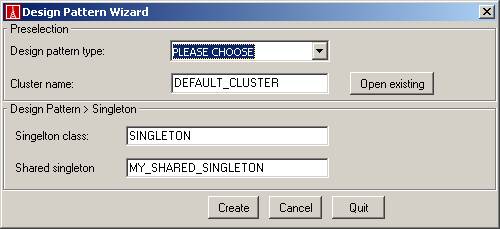
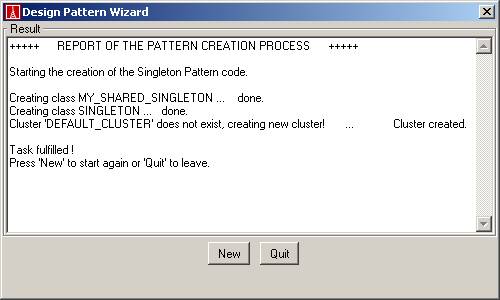
The fields for these options are filled with default names. Feel free to change these names to fit your need. If you type in names of existing classes from the cluster given above, the generated code integrated into the existing code. A copy of the original files can be found in the same cluster with file extension .bak. If you press Create, your input data is validated and if correct, code is generated. After creation of the code, you will be presented a result window.
If you press New you end up back at the first screen. No files will be changed. If you press Quit, you will leave the application, again, no files will be touched.
2.2 Prototype
The Prototype Design Pattern Wizard screen presents itself in this way:
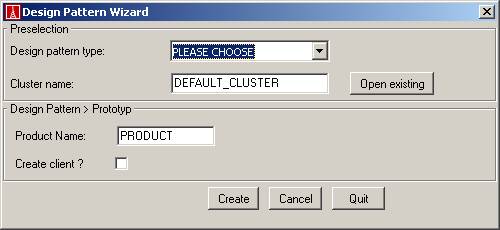
You can choose a class that you want to be a prototype and you can choose whether you want to create a default client by checking the Create client checkbox. The name for the client will be CLIENT. Make sure you have no file called client.e in you cluster if you want to create a client. The default product name is PRODUCT. If no class named PRODUCT (or the name you entered) in your chosen cluster exists, the class will be generated and saved in the assigned cluster. If you choose an existing class the generated and existing class will be merged, by inserting the generated code in the existing class. Before a backup copy of the existing class is saved. The name for the product factory is given by the application ( PRODUCT_FACTORY ). Make sure that you do not have a file called product_factory.e in the cluster.
Code will only be generated after pressing Create.
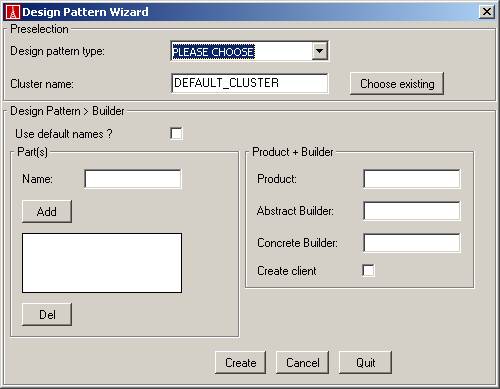
2.3 Builder
The builder presents itself as following:
You can either fill in the fields by yourself or click the checkbox Use default names. The default names are shown in the next screenshot.
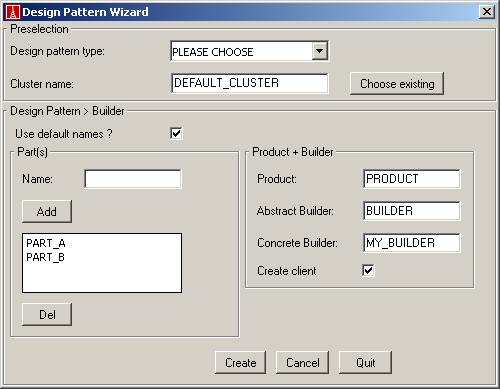
Parts can be added and deleted. To add a new part, type its name into the Name field and press Add. A maximum of three parts are allowed. To delete one part, select it in the part list and press Del. To delete all parts, repeat the previous step for each part. You can of course edit the default names. By selecting the Create client checkbox, a client class file will be generated. The name of the client class cannot be chosen. It will be called CLIENT.e.
2.4 Abstract Factory
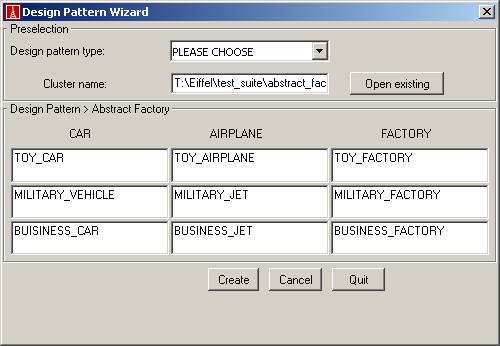
The abstract factory design pattern is applied in two steps. First you choose the names of your abstract products and the name of the abstract factory as well as the number of concrete factories to produce. The screen looks as follows if you decided on CAR and AIRPLANE as abstract products and 3 factories to build:
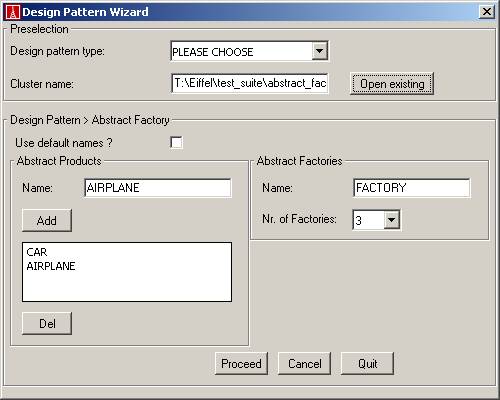
After pressing Proceed you will be taken to the second step. Here you have the possibility to change the suggested names for the concrete products and factories. After editing, it looks as follows:
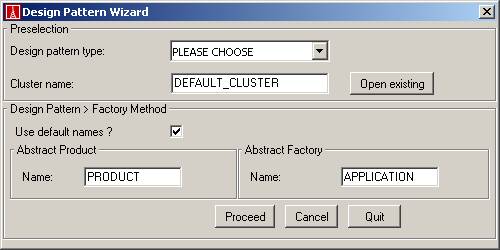
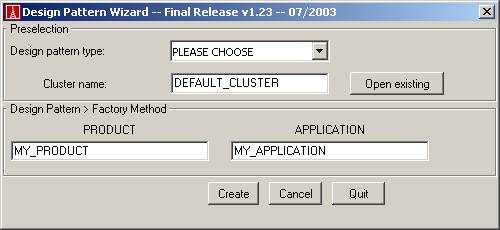
2.5 Factory Method
The factory method presents itself similar to the abstract factory method. In a first step, again the names of the abstract product and abstract factory is chosen. In a second step you can edit the proposed names for the concrete classes.
3 Limitations
The following limitations apply:
- A maximum of three class names are allowed in any list of all design patterns.
- Name of clients cannot be chosen. They will be called CLIENT.
- If you apply a design pattern to an existing class and a feature with the same name as a newly created feature already exists in the existing class, the new feature will nevertheless inserted but with an additional comment, that asks you to manually merge the two feature or rename one of them. A warning in the result report indicates these cases. The generated classes will not compile before you have removed the ambiguity.
- The name of the product factory of the prototype pattern cannot be chosen. It will be PRODUCT_FACTORY.